Pages

Saturday, October 29, 2011

Yes, People use our Pergola Plans!

Lots of people send photos of what they do with our pergola plans!

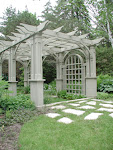
Here's one built by Ed McCormick in New Jersey. Thanks for the note ED! Great Work!

Ed Said :
It took me two years to complete it, but the structure is finished and stained. In the spring I will make a blue stone and brick pathway underneath. I have planted wisteria vines on the three trellises ( a bear to buld I might add).

The structure adds an additional module which was stepped up due to grade.Thanks for the great plans.


Warm regards, 

Ed McCormick

Ed, now that you have the new skills, these kind of pergolas and laminations will be much easier. Nice work adding your own touches, like the routered rafter tails and even the additional bent forward. I think it turned out great. Be sure to send us some shots when the landscaping is finished!

Here is another one sent in by Cathy in Washington!
Cathy Wrote:

These are a few pictures of our recently completed pergola from the plans we purchased from your website. As you can see, we modified them to fit the shape of our house. We are both VERY pleased with the way it turned out.

Cathy... I would be very pleased too!  You did a beautiful job adapting the plan to your home and the builder did a gorgeous  job....this one is by the book! I am very impressed...

You both have a free plan for your next project... Please choose whichever one you like. I am posting new plans as available in the coming weeks... so stay tuned! Some very interesting arbours with laminated arches are coming up!

These photos are actually pergola projects derived from the same plan--   P012 Pro Pergola Plans (click for more info)

There are 2 versions available, one is downloadable, and one is printed. The printed one comes with full size templates that you can trace onto sheet goods to make a hard template... Most people buy the printed version than the downloadable for that reason.

Happy building everyone!

L

Wednesday, October 26, 2011

Pergolas with Curved Beams

Curves are hot when it comes to Pergolas and Decks. This a great example of curved pergolas. This one is a minimalist pergola. Just the beam and open sky above. There is a square pergola beyond, but we will talk about that next post. It is an outstanding pergola on it's own.

The client had a circular patio, so we made the pergola a match for the curve. Luke Simonovski was the builder and I did the computer rendering for this curved pergola and worked with the client, (also a designer), until he was happy with the look.

Many TV builders will fake curves for outdoor, by making thousands of little cuts in the beams to enable them to bend. Fact is, when you make all those little cuts, they get weak, and the end grains soak up moisture, which means it will rot prematurely.
When it comes to curved pergola beams we use solid dry lamination methods. We know the right adhesives and use kiln dried lumber for long lasting structural laminations.

To see more photos of this curved pergola click here

If you are in need of laminated curved beams for a pergola or decks get in touch by email or phone at (888) 293-8938  We will need to know the length and radius.

Thursday, September 15, 2011

P121 Pergola Extended to 12' Wide


 This is one of our most popular pergola plans, (available at Lee Valley Tools). Our client asked for a pre-finished version 12' long at the base. We'll get a plan out by next spring for this size, but most builders should be able to scale up from the stock pergola plans.

This Pergola plan comes with a molded bench design as an option. The digging on this site was a nightmare so we enlarged the lower beam and carried the bench with the existing structure. This plan includes a 6' radius curved 4x4. 

 During assembly you need to be careful to confirm the radius before the glue sets. Glue is a deceiving term--we use waterproof epoxy for all outdoor laminations.

 This is what the curved pergola beams look like after the epoxy has cured--Before sanding.


 Here are the beams all sanded out, faired (a boatbuilding term which just means to make the curve natural and even). We notched the beams to carry the center of the upper beams in the shop. As I mentioned, every stick of lumber in this project was pre-stained with high quality finish prior to installing, (click for Stain Guide). Lumber from this project was Kiln Dried. We can sell you the plans and materials in Southern Ontario. (Call 888 293 8938 for pricing).

If you need to buy any curved beams, braces or rim joists, Get in touch with Me (Lawrence) at the same number. We do a lot of exterior laminations these days.


Wednesday, April 6, 2011

A Pergola on Decks with Hot Tubs

Large decks need a pergola that fits. This hot tub pergola is a perfect match for the proportions of this deck.


This deck with pergola was designed and built for a home near Montreal Quebec. Pre-finished western red cedar, with solid and semi transparent finishes. Tempered glass rails frame the view rather than obstruct it.


I am sure you can imagine yourself enjoying this view, relaxing in your hot tub, shielded from prying eyes of neighbors. Notice the curved cuts on the underside of the pergola rafters.


Speak to one of our local design builders about creating this kind of retreat at your home!

To see more photos of this deck and pergola click here.

To find your local builders of decks and pergolas click here.

To see the video of this deck and pergola project click here

Call 888 293 8938 for a consultation.